Targets
QEMU setup
This document describes how to run TRS for the QEMU target. It is assumed that
you have completed the procedures outlined on the Initial setup page and
at least built the firmware for the tsqemuarm64-secureboot target and the
trs image. If not, begin there before proceeding.
Run
After the build is complete, you will be able to run it on your host system using QEMU.
$ make run
U-Boot is already set to boot the current kernel, initramfs, and rootfs upon initial startup.
Hint
To quit QEMU, press Ctrl-A x (alternatively kill the qemu-system-aarch64 process)
If everything goes as planned, you will be greeted with a login message and a
login prompt. The login name is ewaol as depicted below.
ledge-secure-qemuarm64 login: ewaol
ewaol@ledge-secure-qemuarm64:~$
Test
Once the build has been completed, you can run automatic tests with QEMU. These
boot QEMU using the compiled images and run test commands via SSH on the running
system. While the QEMU image is running, SSH access to it works via localhost IP
address 127.0.0.1 and TCP port 2222. TEST_SUITE variable in
trs-image.bb recipe define which tests are executed.
$ cd <workspace root>
$ make test
See Yocto runtime testing documentation for details about the test environment and instructions for writing new tests.
Baremetal
This section will explain how to run TRS on hardware. There are primarily two steps that must be taken. We should a) flash the device firmware to a suitable medium and b) prepare a USB disk with the operating system.
Flashing the firmware
The firmware of a device is unique to that device. As a result, each supported device has its own set of tools and requirements to follow when writing the firmware. Device specific flashing instructions for TRS supported devices can be found at the Installing firmware page.
Warning
If the firmware is to be flashed on an SD card, the SD card should be found
under /dev/sdX, where X is a letter associated to the card as recognized
by the host system (ex. /dev/sda or /dev/sdb).
Flashing the OS and rootfs
TRS builds an OS and a root filesystem that are compatible with all devices, as opposed to the device firmware that is device-specific. Therefore, it is sufficient to write a “wic-file” to a device (eMMC or SD card) in order to get the OS image and root filesystem onto TRS supported devices. In TRS, it’s the image named as “trs-image-trs-qemuarm64.wic”, that should be used. Although the wic-file name contains QEMU, it is the correct one and should be used for all devices.
$ sudo dd if=build/tmp_trs-qemuarm64/deploy/images/trs-qemuarm64/trs-image-trs-qemuarm64.wic \
  of=/dev/sdX bs=1M status=progress
$ sync
Boot TRS
Plug-in the USB stick, SD-cards and reset the device. If the USB stick or SD-cards is detected, TRS will boot automatically.
Hint
Prefer USB 3.0+ ports always. If you are experiencing difficulties booting TRS, interrupt the U-Boot boot sequence and verify that your disk is identified.
=> usb start
=> usb storage
  Device 0: Vendor: SanDisk Rev: 1.00 Prod: Cruzer Blade
            Type: Removable Hard Disk
            Capacity: 29340.0 MB = 28.6 GB (60088320 x 512)
Docker
This installation method has been created to aid developers in quickly setting up an initial TRS development environment. By leveraging the scripts and Dockerfile available in the trs repository, with just a few steps you can have a TRS-development environment running in a docker container. The benefits of using a container for your development environment include quickly reproducing your environment, speed of setup, all devs in a similar environment, can be customized/extended to meet your needs, usable across different host platforms, and more.
Container Configuration
This section provides an overview of how this container is set up.
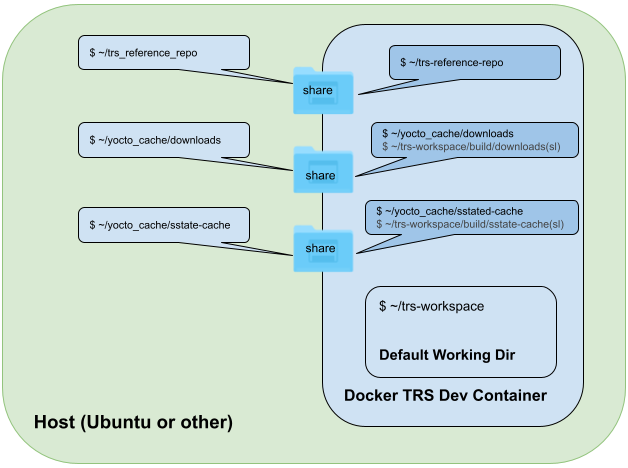
Referring to the diagram above:
The username is
dev.When logging into the container, it defaults into the pre-determined
$HOME/trs-workspacedirectory.Under
$HOME/trs-workspaceis the./builddirectory that has a softlink to the$HOME/yocto_cache/directories.This docker configuration provides three shared directories.
The first,
$HOME/trs_reference_repoon the Host is shared with$HOME/trs-reference-repoin the container. This allows a user to keep it updated from the host side and potentially be shared by multiple containers.The second and third directories are tied to the creation of a Yocto build cache, also to reduce build times. These default to
$HOME/yocto_cacheon the host and container. Two subdirectories are created under$HOME/yocto_cache. These are$HOME/yocto_cache/sstate-cacheand$HOME/yocto_cache/downloads
The default directories/shares described above may of course all be customized by modifying the Dockerfile and scripts, but note that the naming must be assured to be consistent in all the files.
Tested Environments
The instructions/scripts in this section have been verified against Ubuntu 22.04 desktop machine and a share server environment also based on Ubuntu 20.04.
Host Prerequisites
Assure that Docker has been installed on your Host development machine
$: docker --version;
Docker version 20.10.19, build d85ef84;
Note
These instructions assume the user name is dev.
Installation instructions
Since there are instructions for both the Host running Docker and the Container that will have the Ubuntu 20.04 TRS development environment set up, the following sections will delineate the difference by using “Host” or “Container” in the header. That way a user will know where the commands are intended to run.
1. Clone the TRS repository (Host)
Cloning the repo to be able to easily grab the scripts.
$ cd ~
$ mkdir trs-repo
$ cd trs-repo
$ git clone https://gitlab.com/Linaro/trusted-reference-stack/trs.git
Optionally check that the Dockerfile and scripts are present:
$ ls ~/trs-repo/trs/scripts/docker-scripts
Dockerfile  run-trs.sh  trs-install.sh
2. Build Docker Image (Host)
Create a docker image, named trs.
$ cd ~/trs-repo/trs/scripts/docker-scripts
$ docker build -t trs .
Note
The above defaults to a UID/GID of 1000/1000; typical of an Ubuntu
Desktop. If the host has a different UID/GID and it’s desired for the
container to have the same, use the following command instead of the one
above:
$ cd ~/trs-repo/trs/scripts/docker-scripts
$ docker build --build-arg USER_UID=$(id -u) --build-arg USER_GID=$(id -g) -t trs .
Hint
During a docker build, it’s not uncommon to see warnings such as the following that can be ignored, for example:
WARNING: apt does not have a stable CLI interface. Use with caution in
scripts.
Optionally, after completion of the docker build, you can confirm that the images are there and look OK. Assuming you had no other docker images, you should see something similar to the following:
$ docker images
REPOSITORY   TAG       IMAGE ID         CREATED            SIZE
trs          latest    2a10a95eacd2     10 seconds ago     336MB
ubuntu       22.04     a8780b506fa4     4 weeks ago        77.8MB
3. Download and sync the TRS source using Repo tool (Host)
As described above, the Host and Container share the TRS repo in a shared directory. This section sets up this share TRS repo with the following commands.
$ cd ~
$ mkdir trs_reference_repo
$ cd trs_reference_repo
$ repo init -u https://gitlab.com/Linaro/trusted-reference-stack/trs-manifest.git -m default.xml
$ repo sync
With all the above steps completed, we’re now ready to launch the TRS container!
Warning
The location above is important as this is a shared folder between the Host and the Container. If the user chooses to change this location, the scripts/Dockerfile must be updated to align.
4. Create and enter the Container (Host)
The following commands will launch the container using the Dockerfile built in the earlier steps
$ cd ~/trs-repo/trs/scripts/docker-scripts
$ docker build -t trs .
$ ./run-trs.sh

dev@2d0b8419dac3:~/trs-workspace$
A new prompt will be shown in your terminal similar to the above and you’re now working in the docker container!
Optionally, from the Container, some quick checks can be executed to assure
that the container is set up right. This includes assuring all the shares have
permissions set correctly, and that the build directory is linked to the
yocto_cache directory using a soft link.
dev@92fae72fafee:~/trs-workspace$ ls -l
total 8
drwxr-xr-x 1 dev dev 4096 Jan 27 21:22 build
-rwxrwxr-x 1 dev dev 1936 Jan 27 20:41 trs-install.sh
dev@92fae72fafee:

dev@2d0b8419dac3:~/trs-workspace$ ls -l build
total 0
lrwxrwxrwx  1 dev dev    31 Jan 27 21:22 downloads -> /home/dev/yocto_cache/downloads
lrwxrwxrwx  1 dev dev    34 Jan 27 21:22 sstate-cache -> /home/dev/yocto_cache/sstate-caches
dev@92fae72fafee:

dev@2d0b8419dac3:~/trs-workspace$ ls -l ~
total 16
drwxrwxr-x 17 dev  dev  4096 Jan 19 23:26 trs-reference-repo
drwxr-xr-x  1 dev  dev  4096 Jan 27 21:27 trs-workspace
drwxr-xr-x  1 root root 4096 Jan 27 21:21 yocto_cache

dev@92fae72fafee:~/trs-workspace$ ls ~/yocto_cache -l
total 80
drwxrwxr-x   4 dev dev 73728 Jan 27 22:05 downloads
drwxrwxr-x 259 dev dev  4096 Jan 27 21:28 sstate-cache

dev@2d0b8419dac3:~/trs-workspace$

dev@92fae72fafee:~/trs-workspace$ ping google.com
PING google.com (142.250.188.238) 56(84) bytes of data.
64 bytes from lax31s15-in-f14.1e100.net (142.250.188.238): icmp_seq=1 ttl=116 time=31.7 ms
64 bytes from lax31s15-in-f14.1e100.net (142.250.188.238): icmp_seq=2 ttl=116 time=29.2 ms
64 bytes from lax31s15-in-f14.1e100.net (142.250.188.238): icmp_seq=3 ttl=116 time=26.4 ms
^C
--- google.com ping statistics ---
3 packets transmitted, 3 received, 0% packet loss, time 2001ms
rtt min/avg/max/mdev = 26.419/29.119/31.708/2.160 ms
dev@92fae72fafee:~/trs-workspace$ ^C
dev@92fae72fafee:~/trs-workspace$
If the user, group and shares all look good and a ping verified we have connectivity to the internet, then we’re ready to move on to the final step, which is performing a TRS build!
5. Build TRS (Container)
To verify everything is correct, perform a build by executing the
./trs-install.sh -h -r command. Be sure to include the -h -r options
when kicking off the build script for the build to work correctly.
dev@92fae72fafee:~/trs-workspace$ ./trs-install.sh -h -r
Using Yocto cache from host
Using reference from host
Downloading Repo source from https://gerrit.googlesource.com/git-repo
repo: Updating release signing keys to keyset ver 2.3
warning: gpg (GnuPG) is not available.
warning: Installing it is strongly encouraged.

repo has been initialized in /home/dev/trs-workspace
Fetching: 71% (10/14) Linaro/trusted-reference-stack/trs.git
...
Note
This build currently requires several hours to complete. There will be a number of warnings during the build, but this is OK. If completes successfully, then you’ll see a message prior to returning to the prompt similar to the following:
Summary: There were 4 WARNING messages.
Build succeeded, see output in build/tmp_trs-qemuarm64/deploy directories.
dev@92fae72fafee:~/trs-workspace$
Once the build succeeds, the user can perform a final verification step, which is to execute the steps in the QEMU setup section of this document.